Categories
IT and Tech

Linux From Scratch

I actually attempted to build my own Linux distro from scratch waaaaaaaaay back in the early 2000’s when I got out of college and started working for IBM. I just couldn’t get it to work. Maybe it was because I was younger and impatient or maybe I just didn’t know as much as I thought I did, but either way, I never finished it and has been one of those elusive things that I wished I did much like getting my CISSP.

Now that I have my CISSP cert, I figured I’d give this another go and see if I can finally conquer the challenge I set for myself almost 20 years ago.

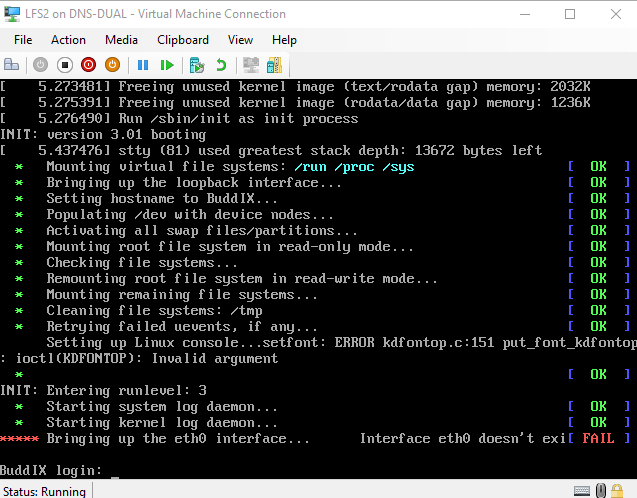
(Yes I know eth0 doesn’t exist. I need to figure out the right drivers for this Virtual Machine)

The Host

To build LFS I’ll need a host OS to build all the toolchain and initial environment. The entire process is very much like cross-compiling software for a different architecture except not.

LFS doesn’t list any recommended distros and while I’m partial to Debian as I’ve been running my servers with it for quite literally decades now, I decided to give a different more modern distro a go simply because I wanted to make sure that all the libraries were new enough to meet or exceed the LFS requirements. After looking around for a bit, I found a great guide from Kernotex on youtube who was running EndeavourOS so I figured I’d give it a go.

The idea was to use a EndeavourOS’s pre-installation live environment as my temporary host on a Hyper-V VM. Normally I use Virtual Box but I figured I might as well give Hyper-V a go.

I ran into some minor hiccups but eventually got it to work. The fixes are outlined in my post here: https://www.buddroyce.com/?p=687

Hyper-V VM Settings were:

  • Generation 2 VM (I totally should have used Generation 1, will cover why later in this post)
  • 6 Cores assigned (I originally had 24 cores assigned but it didn’t work that well. Will cover it later in this post)
  • 8gb-16gb of RAM
  • 50gb of HDD space
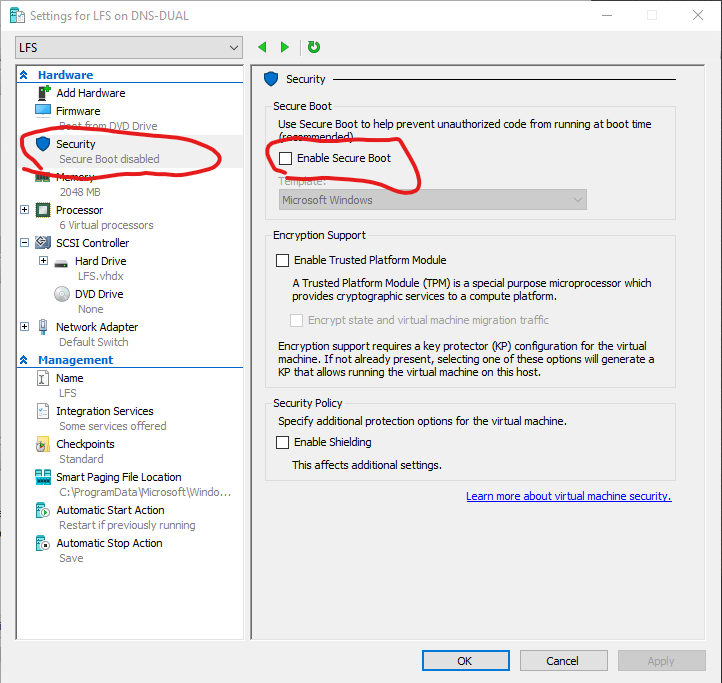
  • TURN SECURE BOOT OFF!! (otherwise EndeavourOS wouldn’t boot)

Why did I use EndeavourOS? Not going to lie, I was just following the Kernotex video on youtube but even though he was building LFS 10.1 and I was building 11.1, EndeavourOS had all the up to date binaries needed with next to no additional software required, which is awesome.

Unlike my attempt at trying to build Unikernels with Unikraft, getting things up and running for my LFS build was waaay smoother.

The Build

I know for years whenever I looked at doing a LFS build, I always ran into problems. Usually versioning and dependency problems that I just didn’t want to sort out or just difference between what was in the LFS book and what I was actually getting.

Thankfully LFS 11.1 came out pretty recently so a lot of the software versions from the book were still valid and most problems were addressed in the book. Between the book and Kernotex’s video, I didn’t find this build all that daunting.

Overall the whole process could have been done over a weekend but I made some screw ups that caused me to back track a little which I’ll cover.

Issues

Initially I ran into problems booting into a Linux host OS. EndeavourOS didn’t want to work and the Ubuntu pre-installation environment didn’t want to work either but those aren’t build specific issues. My build specific issues were

  • Errors Compiling & Testing
  • Cleaning too many things up
  • Not enough system ram
  • Unable to get LFS to boot at all

Issue 1: Errors Compiling

Originally I had the VM using the Hyper-V quick create which automatically defaulted to using 24cores and whatever ram I had.

I set the MAKEFLAG=”-j24″ as an environment variable to make full use of the 24cores but for some strange reason some of my code compiles started spitting out errors.

Reducing it down to 20 cores seem to help but I had to bring it down to 4-6 cores for code to finally compile without any errors.

I don’t know what the cause was but it’s likely to do with the code not being very parallel compile friendly. Concurrency is always an issue and it’s likely that with 24 cores, some code was done compiling but errored out when other bits of code that normally gets done in a 1-4 core system doesn’t exist.

If you run into similar problems. Try reducing the number of assigned cores.

make -j4 will assign 4 cores while make -j1 will assign just a single core to a compile job and there were definitely instances where I had to drop down to a single core to compile and test properly.

Issue 2: Cleaning up too many things

I seriously blame myself for being impatient and just copying and pasting stuff here.

During my first run through on my 3rd day of building LFS. I finished installing all the binaries and reached chapter 8.77 (Stripping). For some stupid reason I decided that it was a good idea to do the optional stripping of debugging symbols from binaries and libraries to save space. Little did I know that that would screw things up for me two chapters later when I tried to build the Linux Kernel.

Ended up redoing the whole thing again and learning from my mistakes. If it’s optional, it’s probably best not to do it until AFTER I get a couple of successful builds in.

Issue 3: Not enough system RAM

I should clarify that the VM has more than enough ram. My system has 64gb of ram but 32gb of it is allocated as a ram cache for my 3 drives. That meant that I had 32gb of ram left which was more than enough… until I try to do something else while code is compiling.

I found that while I could watch youtube videos while I had the VM running, I couldn’t do much else. Firing up any other video games on the host windows machine would cause things to really lag.

It turned out that the VM and my ram caching solution were conflicting a bit. Reducing my ram cache down from 32gb to 16gb solved the issue.

I have an additional 64gb of ram on order to bring my machine to 128gb of ram to fully avoid this even with several VMs running in the background.

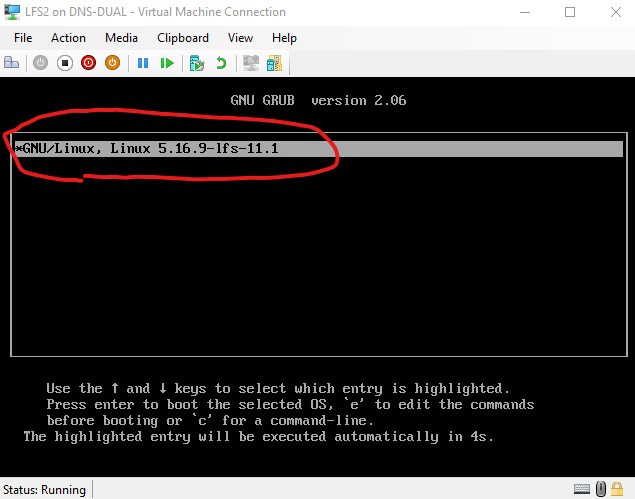
Issue 4: Unable to get LFS to boot at all

This literally took me a day or two to figure out. After getting everything all reinstalled and building out my kernel, I was ready to reboot the system and all I got was… nothing.

It turns out that the base LFS build was meant for legacy systems and not systems running UEFI.

The Hyper-V VM I was using defaulted to generation 2 which meant it supports UEFI and not a legacy bios. The thing is.. once you create a VM and set it’s generation type, you can’t change it again, so I thought I was shit outta luck… until…. I decided to create a new VM using a generation 1 setting and using the existing vhdx hard drive file.

Since the .vhdx file is literally just a disk image, I figured I could use that the same way I could a real hard drive. If everything was physical, I would have just taken the hard drive with LFS on it and shoved it into a system with a legacy bios.

To my surprise, it actually booted.

Categories
IT and Tech

Hyper-V and Linux

After I completed my CISSP certification I wanted a break from all the studying and do something nerdy that I’ve been meaning to do but never got around to it. For me, this was doing a full Linux From Scratch build.

Back in the day I would just load up Linux on another machine to use as a host but since I now have my studio workstation at home with more cores than I know what to do with, I decided it might be a good idea to put it to work running some VMs.

Most of the VM’s I’ve worked with have predominantly been Type II hypervisors (meaning they run off a host OS) and every once in a while I’ll get to build a virtualization server using a Type I hypervisor. For some strange reason I completely forgot that Microsoft’s Windows Server Hyper-V is actually available on Windows 10 and 11 Pro.

With it being a Type I hypervisor, it meant that my VM’s don’t have the operating system overhead like a Type II normally would (read more performance), but more importantly, it also meant that if I wanted to run VMs in the background as a service, I totally could while I still use my workstation. Yeah, it’s probably not the best idea in a production environment but this is my house/home lab.

I’ll cover my LFS build in another post as I’d rather cover some issues I found while using a Linux guest OS under Windows Hyper-V.

Yes I know I could have just used WSL2 but I really didn’t want to mess with my main system all that much, especially since I’d likely be building and destroying many installs as I’d be testing a bunch of distros I’d like to use as the host. Technically speaking I could have just used ANY distro and then update the packages accordingly but I’d rather not muck around with that just to get my LFS build started.

For the most part, I ran into two common issues.

  1. Some distros just won’t boot or just get stuck in a black screen forever.
  2. When they did work, I couldn’t copy and paste from my host (My Windows box) into my guest (my virtualized Linux box).

Issue 1: Getting Linux distros to work properly

After looking at a few distros, I settled on the EndeavourOS pre-installation live environment as my host for my LFS build. However, for some strange reason I couldn’t get it to boot properly.

Found out after a bit of searching that this problem can be worked around by using the Quick Create feature under Hyper-V and unchecking “This virtual machine will run Windows”

After doing that, EndeavourOS booted fine!

Now it’s great that I got it to work but the problem is my main SSD where Hyper-V likes to defaults to doesn’t have that much space and I’d like to have my VMs sitting on a larger secondary SSD I have sitting around and set other options that the quick create menu doesn’t give me (like limiting the size of my virtual hard disk).

So now that I know Hyper-V will work, I just gotta figure out how to configure it manually so I don’t have to use the Quick Create and it turns out all I needed to do was disable secure boot under the host settings

This issue also replicates itself while I was trying to install some other distros, so if you run into the same problem. See if Secure Boot is enabled.

Issue 2: Getting Copy/Paste to work

Yes I know I really should manually type everything but sometimes, I just want to copy and paste text/urls/commands from my browser in my host machine into my VM. When I was running Virtual Box, I was fully able to copy/paste between host and guest no problem after I install the guest tools, but I couldn’t find any that I could use under Hyper-V and EndeavourOS.

Online searches didn’t bring up much other than making sure I have enhanced sessions turned on for both the Hyper-V server and the guest, which I already did but it just didn’t work for the life of me. Sure I could just use a browser from within the VM but I really didn’t feel like doing that.

Apparently the Ubuntu distros from the Hyper-V Quick Create menus have guest tools built into the distro but I couldn’t get it to work either.

The only solution that worked was using xrdp and instead of connecting through the Hyper-V manager (effectively running VMConnect), I’d have to run RDP and remote in.

Thankfully I found a script that sorts all that out for me. I couldn’t get it to work under EndeavourOS but it did work fine under Ubuntu (and it supposedly supports Debian as well).

xRDP – Easy install xRDP on Ubuntu 18.04,20.04,21.04,21.10 (Script Version 1.3) – Griffon’s IT Library (c-nergy.be)

Following the instructions, the installation was pretty painless.

  • Run wget https://www.c-nergy.be/downloads/xRDP/xrdp-installer-1.3.zip
  • Unzip the file
  • Set the script to executable (chmod +x)
  • run the script
  • LOG OUT OF THE SYSTEM (very important)
  • Run remote desktop connection

What works is the ability to copy and paste between host and guest OS’s. I initially ran into a problem where I’d RDP into the VM but would run into a black screen. Turned out it’s a known issue as the user that’s trying to remote in can’t be currently logged in. Logging out of any sessions solves that.

I disable printer sharing because printers always seem to cause problems and I don’t think I’ll need to print anything from my VM.

The sound redirection doesn’t seem to work even when I run the script with the sound redirection flag or run pulseaudio -k but I really don’t care about sound on the VM. Being able to copy and paste between host and client was the real win for me here.

Categories
IT and Tech

Recovering from a MySQL InnoDB crash

On Feb 9th 2019, the datacenter where the Virtual Private Server that I use for this site(and many others) experienced a bit of a hardware failure which required some emergency maintenance.

This happened overnight and when I woke up, I found my inbox with 100+ emails alerts from the various sites that I manage indicating an error with connecting to the database.

Normally this isn’t a huge issue but this time things were different. The MySQL server not only wouldn’t start, it also didn’t provide any logs in either the MySQL error log or the system error log. I didn’t have any recent backups and neither did the datacenter, so this meant that had to do some serious guess work.

If that sounds similar to what you have to deal with, don’t worry. It’s fixable.

The Fix

Before you start screwing around with a live production database, unless you have daily or weekly backups that you would be ok with, the first thing you’re going to want to do is extract whatever data you can.

To do that, we’re going to boot the MySQL in forced recovery mode. There’s a line in your mysql my.cnf that says “innodb_forced_recovery = 0”

Change that 0 value to 1 or just add that line if you don’t have it.

This may or may not work depending on the issue. If it doesn’t work, try a value of 2 or 3. If recovery levels 1-3 won’t work for you, there’s still hope as there’s also levels 4-6, however, do understand that recovery levels 4-6 may cause data loss with level 6 resulting in guaranteed data loss. So work your way up from level 1 and pray to god that your database boots up in the earlier levels.

In my case, I had to use recovery level 4 which puts me in a risky position but at least it booted.

Once you find a level that boots, it’s time to backup and restore your databases/tables

Backup and restore MySQL

For this you have two options. Either export the databases using phpmyadmin or use mysqldump.

Both tools will fail once it reaches a table that’s corrupted so your mileage may vary.

To dump ALL databases run

mysqldump –all-databases –single-transaction –quick –lock-tables=false > someName-full-backup-$(date +%F).sql -u root -p

To dump one specific database run

mysqldump -u username -p databaseName –single-transaction –quick –lock-tables=false > databaseName-backup-$(date +%F).sql

To dump one specific table run

mysqldump -u username -p –single-transaction –quick –lock-tables=false databaseName tableName > databaseName-tableName-$(date +%F).sql

Once you have everything backed up, this is where it may be easy or not as it depends on what the issue is and what innodb recovery level you had to use.

Finding the faulty table

Finding the faulty table

Completely remove MySQL server and do a fresh re-install

This step

Remove MySQL completely (instructions for a Debian based system)

sudo apt-get remove –purge mysql\*
sudo apt-get clean
sudo updatedb

Reinstall MySQL (in my case it was 5.6 or 5.7)

Download the mysql repository configuration tool

wget https://dev.mysql.com/get/mysql-apt-config_0.8.12-1_all.deb

(you can get whatever the latest version is at
http://dev.mysql.com/downloads/repo/apt/ )

Install the tool using

dpkg -i mysql-apt-config_0.8.9-1_all.deb

You get the option of selecting versions 5.6 or 5.7. I went with 5.6 because that’s what was running before.

Update the apt repo list and install the damn server

apt-get update
apt-get install mysql-community-server

Re-install the mysqli connector (in my case I needed it for php5.6 and php7)

apt-get install php5-mysqlnd
apt-get install php-mysql

Note: you can get away with php5-mysql but for MySQL 5.6 or higher you’re going to want mysqlnd. (the ND stand for Native Driver).

While it php5-mysql and MySQL 5.6+ will most likely work, depending on the level of error reporting, you may get a LOT of notices about incorrect minor versions. It’s a problem I ran into before and it’s more annoying than anything.

To restore a backup:

For full backups

mysql -u root -p < full-backup.sql

For a specific database

mysql -u [username] -p databaseName < databaseName-backup.sql

For a specific table

mysql -u [username] -p databaseName < databaseName-tableName.sql

Understanding the InnoDB recovery levels

Categories
IT and Tech

How to reset Nintendo 3DS Parental Lock

Growing up almost everything I got was 2nd hand and as a grown ass adult, I still rarely if ever get anything “brand new” things these days.

That said Christmas is coming soon and with Pokemon Sun and Moon being released on tomorrow on November 18th, I know there are going to be a few people who may end getting themselves a 3DS or asking for one in the near future.

For those who are in a similar boat as I was and still am and pretty much perpetually stuck buying second hand gear, if you end up getting a 3DS with a parental lock and don’t have access to e-mail address that’s associated with the parental lock, you can still reset it.

This works for the 3DS, 3DS XL, 2DS, New 3DS, New 3DS XL and I’m pretty sure it works for the Japanese LL versions(which are the same as the XL versions but for the Japanese Domestic Market or JDM).

Technically speaking, this is really only for folks living in the US but will work outside as well. Since I’m in Canada, I’m technically supposed to call Nintendo of Canada but I got this to work as well.

If you’re looking for a Master Code generator, you’re wasting your time here. Unless you have an older 3DS that hasn’t been updated in a loooooong time, the Master Code generators you find on the net for the most part don’t work anymore since an update Nintendo put out over a year ago. This is the proper method Nintendo wants you to use. It’ll cost you a whopping $0.50 USD.

<To do the reset go here>

You’ll need the units serial number (located on the back), the Inquiry number (more on this after) and an e-mail address for Nintendo’s automated system to e-mail you the master code.

To get the inquiry number goto SYSTEM->PARENTAL CONTROLS->FORGOT PIN->I FORGOT->When prompted to send an e-mail, hit CANCEL. You will see a screen with your Inquiry number. (it should be 8-10 digits long).

As mentioned earlier, this online automated system only works for those in the US. If you’re elsewhere they want you to call your countries distributor or something, but thankfully, you can still lie and say you’re in the US. For tax verification they’ll ask what state. I just use NY and found a random zip code on Google.

They’ll need some sort of credit card to prove you’re an adult and charge the card $0.50USD. I’m not too sure if VISA debit also works but I don’t see why not.

Once you get all that info entered, you’re pretty much done.

The Master Key is only valid for a couple of days and should be 5 digits. The 3DS does not “call home” for any activation and doesn’t have to be online at all. If you enter the Master Key and it says something about it being invalid, the most common error I found is the date being wrong. if that’s the case, you can change it in your system settings.

I hope that helps some folks who ended up getting a second hand 3DS and wanted to get rid of the parental lock.

Cheers,

Budd

Categories
IT and Tech

An upgrade on a downgrade

A little over a month ago when the Abyssian Knights Kickstarter was in full swing, I sold my Intel Skylake based CPU/Mobo/Ram to a friend of mine to fund some of the marketing.

Ended up resurrecting my old Core2Quad system. Even overclocked, it still felt a bit sluggish so I decided to see to see if I could get any el-cheapo chips off ebay for my ghetto socket 775 system. Then I found some people selling some old socket 771 Xeon X5460’s that have been modified to fit in the socket 775 mobo.

That was a month ago. The chip finally came in today. I think I spent like $30-$40 for it. I figured, if it works, great, if not it wasn’t a huge loss. Dropping in the chip, I was expecting some serious issues but it ran without any problems except for the system telling me “BIOS update recommended. To unleash this CPU’s full power, please perform BIOS update procedure” or something like that. I already had the latest BIOS for my board (from way back in 2010), but I figured what the hell, I’ll give it a shot.

BIOS updated. Same thing, then I read something about some BIOS microcode that had to be edited to get it to work. Rather than spend the rest of my day trying to figure it out, I found a handy Chinese site that already had a version of my BIOS with the microcode edits. Did the update and BAMN. No more nagging screen. It didn’t seem to make the system any more stable but whatever.

In case anyone else is in the same position I’m in with an old ass socket 775 that’s looking to upgrade to a Xeon (cause you’re also too cheap to spend money on a real upgrade). Here’s the Chinese site with the socket 771 microcode injected BIOS updates.

http://genius239239.myweb.hinet.net/771/

Overall, everything feels a bit snappier. My Cinebench scores went up a decent amount (no where near my workstation at the studio). Ended up overclocking the thing from 3.16ghz to 3.475ghz. It’s running completely stable (so far).

Definitely worth the $40!

Categories
IT and Tech

Adobe Premier Audio Sync Issues

Being my own video editor sucks. For some strange reason when I load up certain videos into premier just to do something like ad music to or edit/trim a section off some, a lot of the times, the audio goes out of sync somewhere halfway through the recording. The weird thing was that the video is fine outside of Adobe premier!!!.

I was putting together the Abyssian Knights Kickstarter Post-Mortem for backers today and the sync started off ok but was pretty bad 3/4 into the video, so I decided to find a solution.

It turns out that my iPhone that I recorded everything with actually has variable frame rate recording. Even though I’m setting it to 1920×1080@30fps, the framerate isn’t locked at a solid 30fps. Thankfully Handbrake has an option to transcode videos to convert videos to either constant frame care or variable frame rate.

ConstantFrameRate

So I loaded up the video and started processing it. Fired up the video and the audio was properly sync only problem was.. the whole video was upside down!!! For some stupid reason Handbrake must not have understod Apple’s method to saw “this side up” so I had to dig up on the internet to find a way to rotate video.

After a bit of searching, I found that Handbrake can rotate video’s via command line. Turns out the command line options can also be entered as part of the advanced options.

CustomRotate_Handbrake

The trick to fixing the upside down image as to use: Custom –rotate=3 (3 being 180% rotation).

Hope this helps anyone with a similar problem or at least I know it’ll help me when I make the same screw up again.


Cheers,


Budd

Categories
GameDev IT and Tech

Unreal Engine 4 Swarm Farm

UE4_SWARM

Anyone who’s tried to hitting the build button in Unreal Engine 4 in a level that’s got a lot of lighting going on will know that the build process can be pretty tedious. Building the lighting in the Sun Temple demo level that comes with UE4 at production level takes about an hour or so.

Being annoyed that I had to wait so damn long to build lighting, I figured Epic would have provided some way to distribute the computational load across multiple machines and did some research. It turns out that Epic did provide this functionality but all the documentation for it isn’t in the UE4 but rather in the older UDK documentation.

UDK SWARM DOCUMENTATION HERE

While it didn’t change a whole lot there really wasn’t a whole lot on the net that covered using Swarm across multiple machines so I figured I’d share how I managed to get it working for me.

This was tested on my workstation running a tetradeca core Intel E5-2683 v3(14 cores, 28 threads) and my Alienware 17 rocking the quad core Intel i7-4900MQ(4 cores, 8 threads). Engine versions were UE 4.12 on my workstation and UE 4.11 on my laptop (mostly just so I could see if it work!).

My workstation was setup as the primary client that had Unreal Engine 4 running as well as the Swarm Coordinator and the laptop as the secondary client running the SwarmAgent.

The SwarmCoordinator.exe and SwarmAgent.exe executables can be found at:
C:\Program Files (x86)\Epic Games\(engine.version)\Engine\Binaries\DotNET

All the settings are in the pic above, but to explain the different parts:

AgentGroupName -> The name of your group. It *IS* case-sensitive.
AllowedRemoteAgentGroup -> For simplicity, make it the same as AgentGroupName
AllowedRemoteAgentNames -> On the controller, put down the name or IP address of the secondary client. Additional names/IP addresses can be added seperated by a commas. On the secondary client, just put the name/IP address of the primary machine you’ll be sending the job from.
CoordinatorRemotingHost -> On the Primary machine that’s also running the controller, just put the hostname of your primary machine or the IP address(yes 127.0.0.1 works too). On the secondary add the name/IP of the machine that the co-ordinator is running.

I’ll have to revisit this later when I have more than 2 machines with the swarm agent running. Hopefully it’ll help someone else trying to speed up the process of building lighting in UE4. Adding additional machines is really just a matter of adding them to the AllowedRemoteAgentNames list. I’ll have a proper answers once I get my render farm built out.

Categories
IT and Tech

64bit FFT Plugin for Photoshop

This is pretty obscure and took me a while to get working right. If you’re looking for a Fast Fourier Transform plugin for 64 bit Photoshop, it can be pretty hard to find. Thankfully someone named Phil Thornton modified a plugin that was originally made for 32bit Photoshop by Alex Chirikov to run on 64bit versions.

You can get it here

(what can the FFT plugin do for you? See this )

This was tested on a machine running Photoshop CC 2015 under Windows 8.1. I originally copied everything into the plugins folder and kept running into a disk error for some reason but managed to get it to work by moving the .dll file to the Photoshop root folder. The exact steps taken were.

1.Copy the .8bf-files from “\bin\x64” to “C:\Program Files\Adobe\Adobe Photoshop CC 2015\Plug-ins”

2.Copy libfftwx64_3-3.dll from “\bin\x64” to “C:\Program Files\Adobe\Adobe Photoshop CC 2015\”

I already had the Microsoft C and C++ development libraries installed on my system so I didn’t need the other .dll’s but I’d have to assume that the files go in the same place.

Hope that helps someone out there!

Cheers,

Budd

Categories
GameDev IT and Tech

CryENGINE3 and multiple developers

Ok so every since I started using CryENGINE 3, it works fine when I screw around with the engine on solo projects but is almost always a huge nightmare where I have to add another person onto the project. Why? Because for the longest period of time, sharing .CRY files with team members meant I always had to worry about a file corruption error. Turns out CryTEK accidentally got rid of the old file access permissions error and replaced it with an error that said “files could be corrupt”.

I’ve been working on the Yours Truly Project with Brandon to get it ready for showcasing at th Level Up event at the Design Exchange on April 3rd, 2013 as well as the Toronto Global Game Jam arcade at Bento Miso later in the month. For a while things were ok because I was able to open the cry file he did the terrain and vegetation on and I just worked on a seperate layer. Now during the polishing phase we’re running into file corruption errors yet we know the files aren’t corrupt because the level runs in the launcher just fine.

We tried everything we could and then I was reading on CryDev about something with regards to people who were having corruption issues but the solution was because the login script couldn’t connect to the server properly. That led me to think, “what if I logged in with my credentials on Brandon’s computer?”. So I went over to Brandon’s Alienware (go team alienware!) fired up the editor, logged in with my own CryDEV credentials and proceeded to open the file. Fingers crossed, I clicked on the open button and then…………………… BAM….. FILES LOADED SUCCESSFULLY!!

Who would have thought the Files Could Be Corrupted error was really an access rights thing? Got Brandon to join Team Whisky Tango Foxtrot on CryDev.Net and added him as working on Yours Truly and so far we’ve had no problems.

The take away from the story?

If you’re going to be working with CryENGINE 3 with other people

1. Make sure you’re all on the same team working on the same project. You can assign team members and set them working on a particular project over at CryDev.Net

2. Terrain and Vegetation is stored in the cry file NOT on layers. So whoever is doing your landscape/level design will have to give out their .Cry file. Make sure it is saved to be associated with the project you’re working on or to Global Share if you don’t have a project.

3. Since everything else is on layers, use layers for everything else. If you have an environment artist placing brushes, another person doing cinematics and another person doing flowgraph logic. Have them all use external layers (set as external in the layer properties).

4. Share using source control and import the stuff your team members make. Dropbox works but might mess things up 😐 Given how CryENGINE like the Unreal Dev Kit as well as Maya and 3DS Max like to crash from time to time, you’re better off not taking anything else along with it when it croaks. That and source control like SVN will allow you to roll back to a previous working version that does work.

Just my $0.02 that I hope others will find useful. Althouh CryENGINE3 has it’s quirks it’s by far the best engine I’ve ever worked with (sorry Unity and UDK)

-Budd